Category Archives: Ms. Jenavieve

Still no joy with the running issue

Just a little more info:

Took her out for a drive last night, got her warmed up good, brought her back and checked the damper oil again. The dampers still move nice and slow at temperature, so I think I can rule them out.

Also finally got around to pulling the plugs again (they look fine, no difference from one to the next) and did a compression check. Front to back: 120/120/120/125. Not exactly great but not surprising (the engine does have 98,000 miles on it), but more importantly no discrepancies between the cylinders to speak of.

Called Delta yesterday and ordered a Pertronix distributor and Pertronix coil. Crossing my fingers that that will solve the issue. I’ll be really ticked if it doesn’t, because I am running out of ideas…

Searching out a weird running issue, part 3

Here’s where I’m at. Still no joy.

Hooked up a Mityvac at various places (not much to check since most of the vacuum lines are capped off now). Brake booster holds vacuum nice for at least 10 minutes, figured that was long enough for a test. When I connected the Mityvac to the main manifold port, the gauge bounced all over, which according to what I could find indicates a weak or broken valve spring. Very possible, but I don’t think that’s the cause of my issue.

Used a can of spray carb cleaner to try to search out vacuum leaks around the carbs. None that I could find.

Double checked the oil in the Strombergs. Definitely full, and the plungers seem to move very slowly like they should. I still wonder if heavier weight oil might make a difference (I just used the same 20w50 that goes in Ms. Jenavieve’s crankcase) but I have a hard time believing that this is the issue since this is the same oil I’ve always used.

I also, when I had her out this weekend, experimented with different choke settings while driving (when I came to a stop, I would pull the choke a little bit before taking off).   Other than raising the idle, it didn’t seem to make any difference, I still had the hesitation and backfire.  So I really don’t think it’s an issue of being too lean under those circumstances.  If anything, I think it’s too rich which takes me back to ignition…

I still haven’t done a compression test, but I don’t think that is going to solve anything (other than to point out other unrelated issues). I guess I’m at the point where I call Delta and order the Pertronix distributor and coil.

Searching out a weird running issue, part 2

Spent quite a bit of time trying to track down Ms. Jenavieve’s misfire issue. After doing all of this, it still remains. To recap: she starts, idles, and mostly runs fine under most circumstances, but once warmed up, when accelerating from an idle after a stop, she misfires and backfires once or twice. Then, she’s fine till the next stop, and then it happens again. I can not reproduce this at speed (when cruising, I can stomp on the accelerator and she reacts like she should without any misfires). It only happens when accelerating after she’s been idling for a few seconds or more.

Here’s what I’ve done so far:

Carbs were balanced at the Jensen East meet courtesy of Ron Mau and Brett Gibson. Didn’t seem to affect anything.

Screwed down temperature compensators. No change.

Took distributor out, cleaned it up inside and out, relubricated the wick, inspected points (seemed to be fine). Reinstalled distributor, set timing to about 5 degrees BTDC. Seems to advance fine when blipping the throttle. However, the problem persists.

Properly gapped and installed new NGK plugs. Old plugs looked ok. No change.

Removed timing belt cover, disconnected coil, manually turned engine to TDC. Everything lines up as it should: 110/110 on the cams.

Removed bypass valves, cut and installed full face gasket. No change.

I then removed most of the vacuum hoses, removed the vacuum switch, and capped all ports.  Here’s a before and after view, using Mark Rosenbaum’s diagram, which I edited a bit for the “after” diagram:

Original routing:

vaccumroutingORIG

After removal and capping (caps are shown in red, I also capped the vacuum retard port on the distributor which isn’t in the diagram):

vaccumroutingCAPPED

The only vacuum lines in place now are the canister purge line and then T’d to the carbs (the pink line in the diagram). Obviously, the choke connector is still there as is the dark blue line to the fuel tank. All light blue lines are gone, the vacuum switch is gone, and the line to the distributor vacuum retard line is gone. Caps installed on the front carb throttle bypass port, the two rear carb ports, and the port on the intake manifold that was feeding the green lines to the vacuum switch and the vacuum retard on the distributor. Then, reset the ignition timing to approximately 12 degrees BTDC, reset the idle to about 1000 RPM, and it advances to just over 30 degrees at higher RPMs (I couldn’t see the tach and the timing mark at the same time, so I’m guessing I was at about 3000 RPM).

Whew.

Yet, the problem persists. I’m running out of ideas. I really think it’s an ignition issue, and my next step was to talk to Mike at Delta about a Pertronix distributor and coil. I know it’s a good idea, but I hate to go through the expense and time if it’s not going to solve this issue. Anyone?

Searching out a weird running issue, part 1

Well, I just caused myself an afternoon of work (hopefully that’s all it will take). Those of you who were at the Jensen East meet might remember that Ms. Jenavieve had an odd running issue which we looked at while at the picnic: she started and ran just fine, but after she was warmed up she would miss and backfire a few times when accelerating from idle after running at speed for any length of time. Once she got over 2500RPM or so, then she would be fine until the next stop. So, I started thinking about what might have changed to cause this, and remembered that I had cleaned up the engine compartment while at the car wash right before we left for Rhinebeck. Figured it was worth a look inside the distributor, so I popped the cap and sure enough there was a little oily water in there. “My bad #1″… don’t ever wash in there without covering the distributor, it’s not exactly watertight.

So, after removing all the airbox stuff to get at it better, I sprayed some electronics cleaner into the distributor as best I could (not like you can see into it without a mirror), blew it out with compressed air, and cleaned up the cap and put it back together. After I did all this, I decided to check the timing, so hooked up the timing light and it was way too far advanced. I then loosened up the distributor clamp to adjust the timing, and while I was doing that I thought “I should screw down the temperature compensators on the Strombergs like Brett suggested”. So, I took them off, cleaned them up, screwed them down, put them back on, and went to start her up to see if it did anything, good or bad.

This was “my bad #2”. If you remember, I had loosened the distributor clamp a few minutes before. Oops. Of course she started, ran for about 2 seconds, and quit. Crap. So I went back under the bonnet and the distributor had pushed out about a half inch. At that point I decided it was too late in the evening and I was already making bad decisions, so this afternoon I will try to undo the damage I did. I guess the good news at this point is that I might as well take the distributor out all the way and clean it up good and check the points and such before I wrestle it back into place. Not what I had planned, but you know how it goes…

Jensen East 2015

We had to drive a little farther this year for the Jensen East meet, after having it conveniently located in Monroe, WI last year (only a 3 hour drive from home).  The 2015 Jensen East meet was in Rhinebeck, NY, not all that far from the big city.   But, having been hooked last year, we couldn’t very well NOT go.  So, we loaded up Ms. J on her chariot and made the big drive.

jenseneast20154
First rest stop in Indiana.  Doesn’t she look comfy on her trailer?  The hardtop you see is the one that came with her (since replaced with a much nicer one) but we figured we’d bring it along and donate it to the auction.

jenseneast20153
Just checking… yes, that little red car is still tailgating us.

jenseneast20151
A lovely collection of Jensen Healeys, a few Interceptors, and one CV8 all lined up in front of the Vanderbilt mansion.

jenseneast20152
And another shot of many, many Jensens at the barbecue and Jarts tournament.

Madera wood is in, and the dash is done!

Well, got my voltage stabilizers from Moss Motors, pulled the dash apart again, and got one installed, and my gauges are now working properly once again (though the speedo is a little jumpy, just ordered a new speedo cable from Greg since I’m pretty sure that’s the problem). Good to know how much fuel I have in the tank again. That being resolved, I moved on to installing the Madera Concepts woodwork that arrived on Friday. First order of business, after pulling the gauge pod out once again, was to finally “fix” the trip odometer reset cable. In the process of pulling the gauge pod out multiple times, I managed to break off the little plastic tabs that hold it to the back of the speedo. After trying a few different solutions involving silicone glue, I finally cut a piece out of a PVC electrical switch box, drilled a couple of strategically placed holes, and here’s the result. Not pretty, but at least the cable can’t come out, and it’s not like anyone is going to assume the Lotus position to see it:

IMAG0022

Now that that’s fixed, I moved on to getting the woodwork installed. That actually went pretty well, didn’t have to do any customizing other than making the hole for the hazard light switch a little thinner (it’s not the original switch, and the panel was just too thick for it to mount properly). The one concern, which I spent way too much time trying to fix, is that the gauge pod doesn’t sit flush with the opening in the dash (compounded by the fact that there’s a Delta dash cap installed by the PO over it). I had the opportunity to look at another JH this weekend at a show, and I noticed his was the same… when the top of the pod is flush, the bottom is actually recessed into the dash about a quarter to half inch. Anyway, after obsessing about it, removing the dash cap (and finding out why it’s there, her original dash is pretty cracked), bending the spike around on the gauge pod, and generally trying several different ways to make the pod fit flush, I finally gave up, went to bed, and the next day pulled the pod out and mounted the wood to it and just shoved it in, hoping for the best. It actually came out just fine, and I could have saved myself about 3 hours of work if I would have just done that in the first place.

maderacomplete

Her interior is completely transformed.  For the woodophiles (?) the woodwork is a Carpathian Elm Burl (I had to look it up to see what it was, but all I know is it looks great).

Preparing for new dash stuff… of course everything gets complicated.

Decided to tackle the trim rings and bulbs tonight, since they needed to be done before the woodwork anyway. As usual, the part I figured would be difficult was the easy part, and the part that should have been easy… well, you know…

Pulled the steering wheel and cowl off, and undid the screws that hold the top of the cluster in place. Of course, that didn’t allow me to remove the cluster. After looking at it under the dash for a bit and contemplating different ways of prying the rusty center pin loose, I decided to take a chance. Reached up behind and undid the speedometer retention nuts, and pushed it out through the cluster. Popped the bulb out and disconnected the cable, allowing me to remove the speedometer completely. Now I had a place to grab the center of the cluster… reached in through the vacant speedometer hole, got a good grip on the center of the cluster, and gave it a yank… and it popped right out. Whew. I wasn’t looking forward to fighting with that rusty spike from underneath.

Disconnected the oil line and the two harness plugs, and out came the cluster to the kitchen counter (the missus is getting used to seeing JH parts in the kitchen). From there, it was pretty simple to remove the gauges and replace the black trim rings with the chrome ones, cleaning the glass inside and out in the process. Reassembled everything, and the cluster was ready to go back in. At this point, I had spent maybe 45 minutes on the job. Moving along nicely.

So, after supper, I went back out and laid the cluster on the steering column stub, reconnected what needed reconnecting, and decided that before I put it all back together I should probably make sure everything was working right. Tried the dash lights and the new bulbs are a HUGE improvement. So far so good! So, I turned the ignition key to “run”…. and nothing. No movement on anything. Hmmm. OK, must have a bad connection somewhere, right?

So, I checked all the connections… they all seem good. Still nothing when I tried it again. So, just to make sure there wasn’t more mischief afoot, I started her up. She started right up, but still nothing on the gauges (other than the oil gauge of course which is purely mechanical). Well, this isn’t good…

About this time I notice that the radio didn’t come on either. A HA! Must be a fuse!!! So, up went the bonnet and sure enough the #2 fuse was blown. I’m guessing that maybe the cluster wiring touched something it shouldn’t have when I had it loosely lying there. So, I pulled the blown fuse and put in a new one. Turned the key back to “run” again, and this time the voltmeter moved up and the radio lit up. OK, progress.

So, I start her up again. This time, the voltmeter and tachometer behaved as they should have. Feeling a little better about things, but I’m still wondering why the temp and fuel gauges aren’t moving. While I am pondering this, checking connections AGAIN, she starts to misfire. This CAN’T be good!

So, I shut her off, think about things, check connections under the bonnet (maybe I damaged the coil somehow? Who knows) and then start her up again. Harder to start, and she was not running right at all. After about 10 seconds, despite my efforts to keep her running, she died and I could not get her restarted. By this time I am seriously freaking out, wondering what I could possibly have damaged. I’m already paranoid after changing her timing belt, and I went to the trouble to get her at TDC and check the cam marks just to be sure the belt didn’t slip. Fortunately, that’s all good. Whew.

So, I get back behind where the wheel would be if it wasn’t lying on the floor, and I tried to start her again. Still nothing, just turning over but not catching. As I’m doing this, a little bulb goes off in my brain… “you know, I am not hearing that lovely noisy fuel pump clicking away…” OK, now I have something else to troubleshoot! So, up goes the boot lid, and a quick test with my Fluke meter reveals that I am only getting about 2V at the pump. OK… so, after consulting the wiring diagram in the owners manual, I go back under the bonnet and idly wiggle and spin the fuse I replaced in the fusebox. Then, back to the boot, and now I am getting 12V at the pump. Much better. Reconnected the pump wiring, got back behind the missing wheel, and she started right up. Huge sigh of relief. Apparently the fuse wasn’t properly seated in the fusebox. I guess I should go in there and clean things up.

So, the mystery of the misfire now solved (basically, she ran out of gas) I could go back to pondering the nonfunctioning fuel and temp gauges. After doing more testing with my Fluke, I established that there was no voltage on the “I” side of the voltage stabilizer. That would explain why those gauges aren’t working. To confirm, I moved the wires on the stabilizer so that they were basically just a jumper (both wires on the “B” terminal) and the gauges moved right up, though obviously not accurately since they were now getting much more than the 10V that the stabilizer provides. Apparently, whatever caused the fuse to blow also took the stabilizer with it.

So, after Googling around a bit (the club store doesn’t have them that I could find) I found a replacement solid state voltage stabilizer at Moss Motors (which means I get to look forward to getting all kinds of catalogs and email offers for the MG that I don’t own). Since I was ordering one, I ordered two (I like having spares of hard to find items). Good thing I wasn’t planning on driving her for the next week… they should arrive before I get back from vacation.

The fun continues… and maybe my Madera Concepts woodwork will arrive about that same time…

Dash upgrade ordered.

Decided it was time for a completely unnecessary upgrade, just because I’ve wanted to do this for some time. Placed 3 orders with 3 different vendors:

1. Madera Concepts for a full dash wood kit, including the gauge panel surround, because it looks sooo nice.

2. APT Instruments for replacement trim rings for all the gauges. Stock was black, but the new ones will be chrome. I’ve seen pictures and the chrome rings just make the gauges “pop” in the woodwork.

3. Delta Motorsports for 6 new 5W gauge bulbs, so I can actually see the gauges at night. Figured since I had to pull the gauges to install the trim rings anyway…

Also ordered from Delta a new windshield washer nozzle (I wrecked the old one when I stripped her bonnet down, and I’ve been driving around with a hole in the bonnet ever since) and a new shift boot to replace the 41 year old rather ripped up one she has now. Appearance is everything (plus I already had the other stuff coming so the shipping was covered).

Pictures when it’s all done… Madera figures about 3 weeks for the woodwork.

Exhaust is complete, and new timing belt is finally installed.

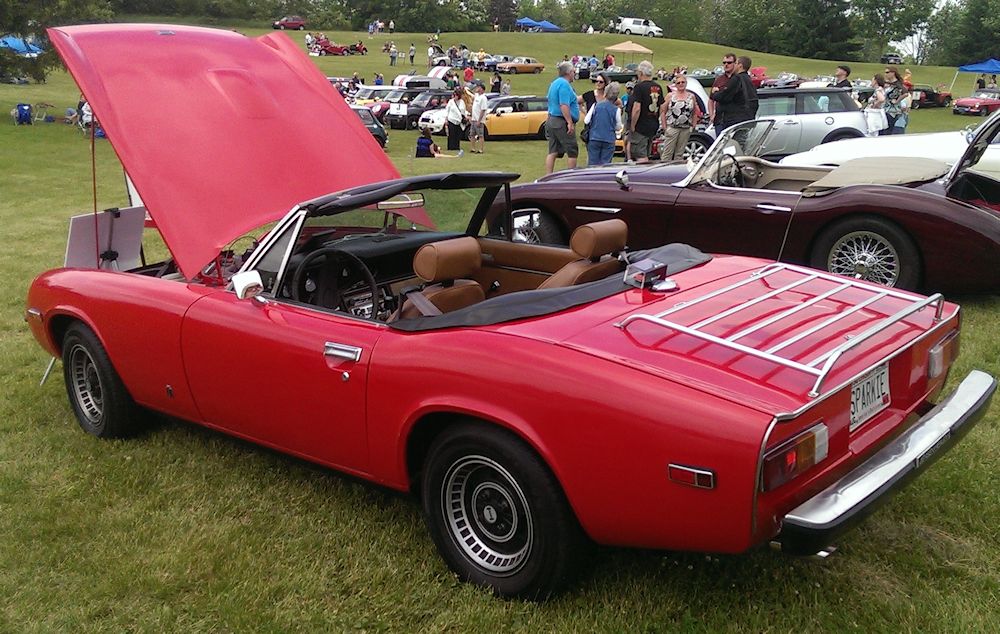
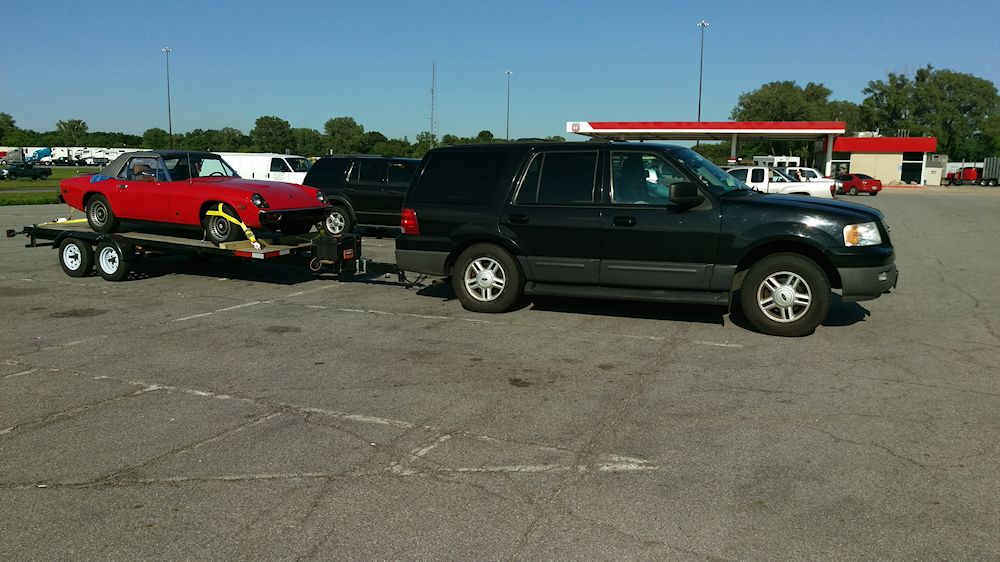
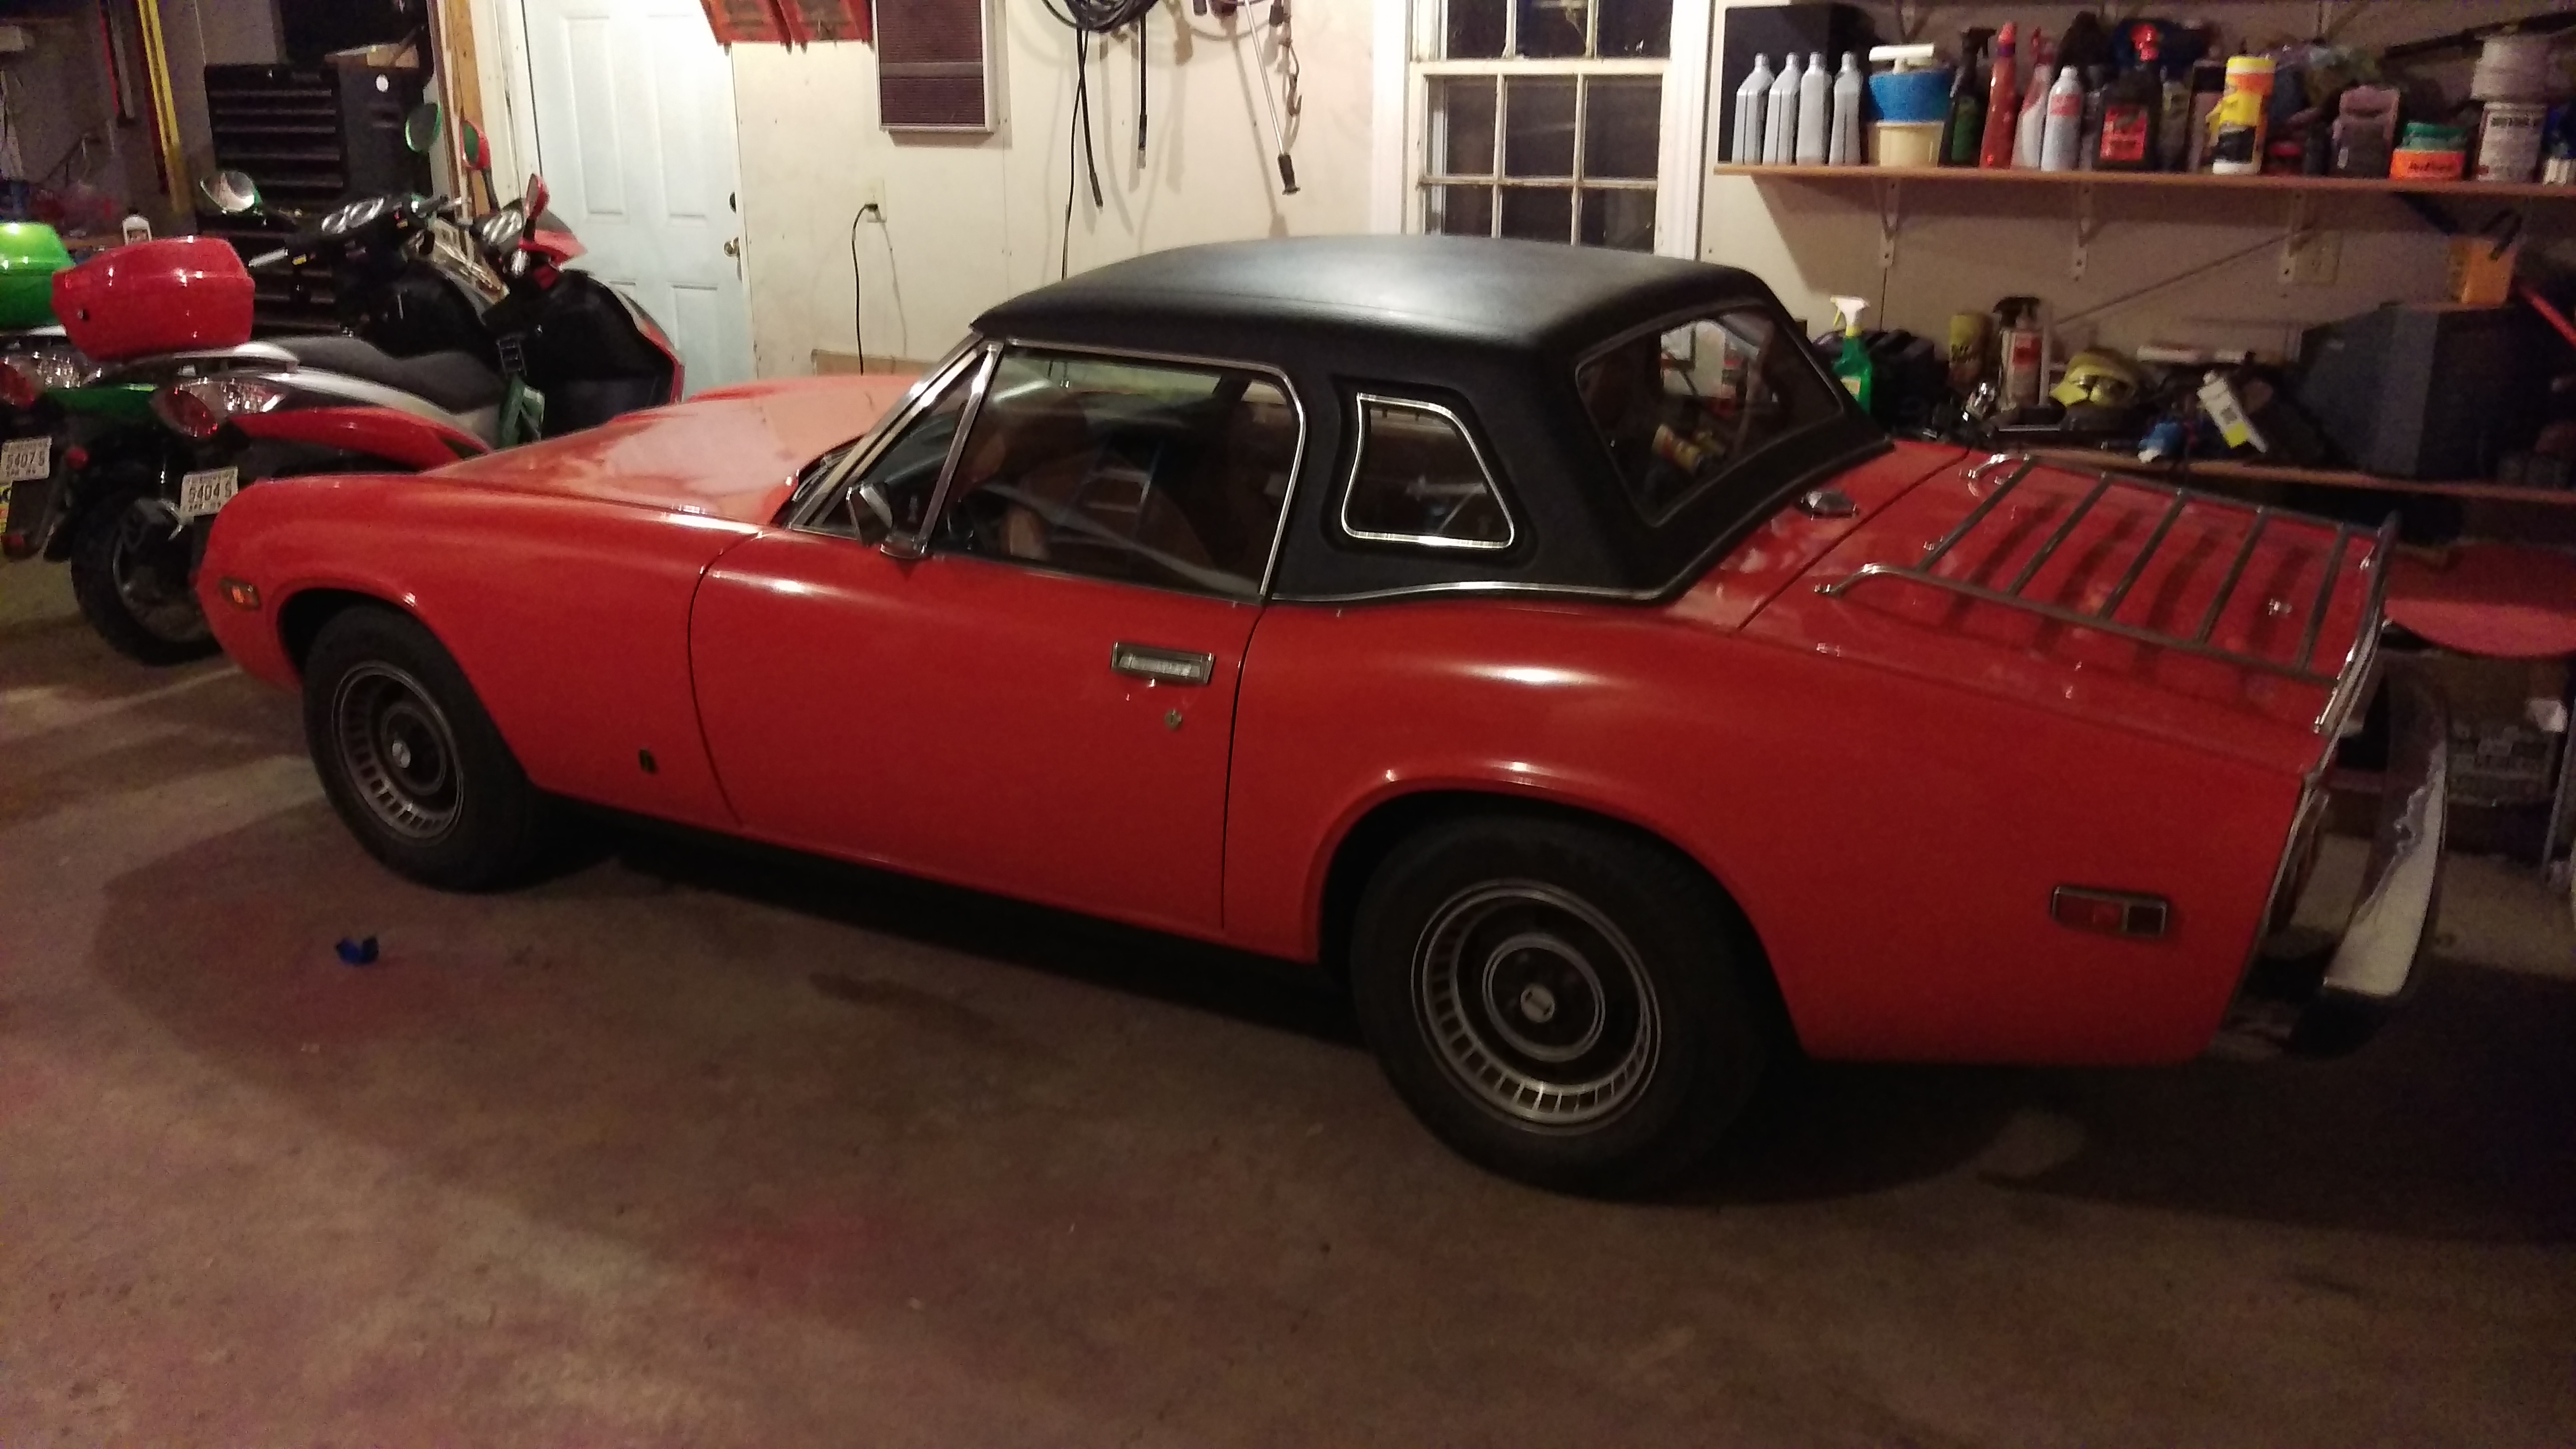
Hey guys… it’s been a while since I posted any updates. Ms. Jenavieve is pretty much past the “project” stage now I suppose, though there is always more to do on these little cars, right?

Anyway, let’s see if I can get caught up.

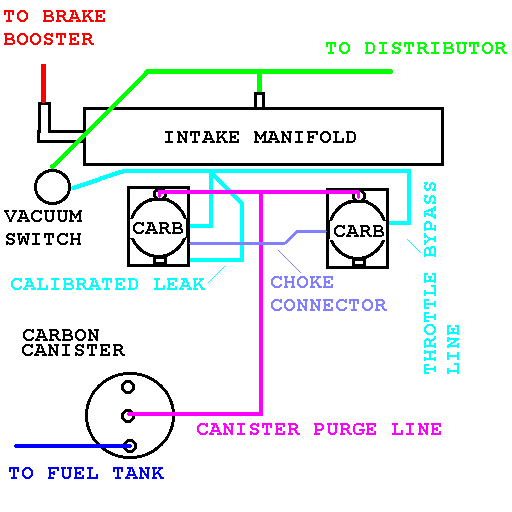
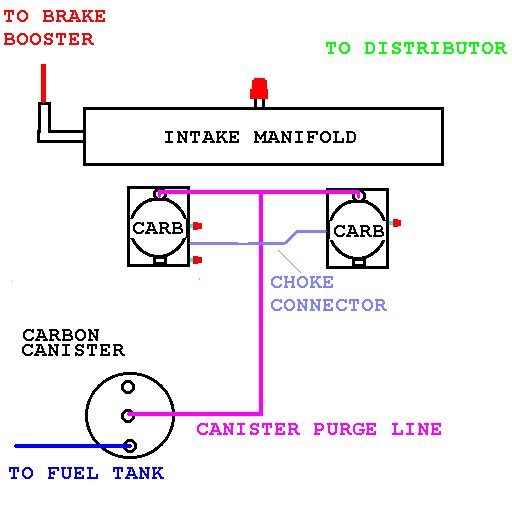
As I outlined previously, I got the new Delta 4 into 1 header installed, and then took her over to the local muffler shop to have them do some magic. Because of the way things lined up, they ended up having to custom bend an offset pipe to mate up from the end of the header to the front of the resonator, along with a flex pipe. Not quite original, but her exhaust is now pretty much brand new from the engine all the way to the exhaust tips (or less than a year old, anyway). And I have to say she sounds absolutely fabulous. It’s a nice change to have all the exhaust noise coming out of the exhaust tips and none from under the bonnet.

I also did install the new cam cover gaskets from the JHPS store, and cleaned up the cam covers while they were off. They are almost shiny now. Reinstalled with the “Jensen Healey” logo right side up and the oil filler at the back of the engine, instead of the front. Nothing too exciting in this process, went very smoothly.

While I was still in “getting ready for spring” mode, I also finally joined the ranks of “official JH owners” with the rite of passage of installing a new timing belt and tensioner bearings. The old belt, from the records I got when I bought her, was changed about 9000 miles ago… but also about 12 years ago, so I figured I’d put it off long enough. The approach I used (got the idea from a friend who’s a Lotus afficianado) was to set the engine at TDC with the 110 marks lined up, then take a bottle of WhiteOut and mark each gear (both cams, crank, and ignition) with a mark on one slot, and mark the old belt with a corresponding mark on the tooth in that slot. Once I had done that, it was a simple matter to remove the belt, line it up with the new one, mark the corresponding teeth on the new belt (counting the teeth between the marks to be sure) and then pop the new belt on in the appropriate location. Worked just fine, the whole process took maybe 3 hours from start to finish… I was in no hurry and I am sure it would go faster the next time since I now know exactly what has to be removed to get at it.

For posterity, here’s the order I did things (I used Greg’s guide as a, well, guide, but there was more to be done than he had outlined:

1. Disconnect battery and coil wires, just because.

2. Remove top half of belt guard (I have the two piece guard)

3. Attempt to remove bottom half of guard. Grumble because it won’t come out at this point, too much stuff in the way.

4. Loosen alternator, remove belt. Remove fan and pulley. Skin knuckles a bunch because of proximity to radiator.

5. Look down and realize that the lower guard still isn’t going to come off.

6. Remove crank pulley. This went way better than I had expected… put a 19mm socket on my ratchet, put a pipe on the handle, and had Mrs. Answerman stand on the brake pedal (since I’ve never had a functioning hand brake) while I first hit my knuckle with a rubber mallet (ouch!) and then the pipe a few times to break it loose. Moved engine BACK to TDC since of course it moved during this process.

7. Now I can remove the lower belt guard. Did so.

8. Got my bottle of WhiteOut and marked one tooth/slot combination on each of the 4 gears.

9. Loosened tensioner and pulled belt off the gears. Loosened upper radiator hose clamp at top of engine, pulled hose off the fitting, and snuck the belt through there. Old belt is off!

10. Removed tensioner (that actually came out fairly easily).

11. Took tensioner to bench, followed Greg’s process at http://www.jensenhealey.com/tech/bearing/bearing.html to disassemble tensioner and replace the bearings. The old ones seemed fine, but since I went this far I didn’t see a compelling reason to NOT replace them.

12. Put newly assembled tensioner in place, loosely.

13. Take new belt, count teeth and make new WhiteOut marks corresponding with marks on old belt.

14. Put new belt on. Take belt off, put on again because I was one tooth off on the crank gear. Triple check all marks and deem it good.

15. Tighten tensioner till the belt tension seemed about like it was on the old one (was able to twist it about 45 degrees between the oil pump/distributor gear and the intake gear).

16. Think about it for a while and decide that I am going to be one of the 12 JH owners that still has the belt guard in place. Put the lower section back on.

17. Reinstall crank pulley and fan/pulley.

18. Reinstall alternator belt and tighten.

19. Reinstall top half of belt guard.

20. Reconnect coil wire and battery cables.

21. Say a little prayer, get in, and turn key. Starts right up and seems to run as well as she ever did. Whew.

It really wasn’t that bad of a process, though with all my careful planning I must have been “off” by a tooth on the distributor gear, because after a day of trying her out I found that she wasn’t quite right. She ran just fine, but was hard to start (especially when hot) and didn’t want to idle (again when hot, which led to a few frustrating restarts at traffic lights). So, off to purchase a timing light (which I’ve somehow gotten this far in life without) and checked her timing. Obviously there were no corresponding marks, but I would guess that her ignition timing was at about 15 degrees ATDC. Yes, that is AFTER TDC, not before. Well, that would explain things. Loosened up her distributor and gave it a little twist and after a few stops and starts got it set to about 15 degrees BTDC (with the vacuum hose attached because, well, I forgot to detach and plug it). Amazing difference in how she runs now, for the first time in forever she actually idles right (though a bit fast, can’t get her idle down below about 1200 RPM) and is much smoother on takeoffs.

Now it’s time to shine her up and drive, because, well, that’s why I have her, right?

Ms. J has a new hat!

I decided to go ahead with something I’ve been thinking about since last fall… a couple of weeks ago I made a phone call, drove over to look, and came back with a nice hardtop for her. The guy who had it had originally approached me at a show last fall and asked if I was interested, and I told him that I would think about it. Finally got back to him, he still had it (and was about to put it on eBay) so after a bit of haggling (with me in the drivers seat on the transaction since I was the guy in his driveway with cash and no need to ship this crazy oversize thing) we agreed on a fair price. And the top, while not original (it’s an aftermarket from Custom Hardtops in California) is almost like new. He bought it new with the can back in 1974, it stayed in the garage most of the time, and for whatever reason when he sold the car, the buyer didn’t want the top. Good for me, though. Actually drove her around for a week or so with the top on before I took it off for the summer.

IMAG0003